
You may have seen the DIY Rainbow Sprinkle Cake
that we featured last fall. Just possibly. Maybe? As it made its way
around Pinterest and back. In case you missed it, let’s just say it
was absolutely fabulous and one of the top posts from 2012! So needless
to say, we’re quite excited because the talented baker behind the
sprinkle cake tutorial… is back again today! With another
straightforward and totally achievable DIY. Kate Wagner of The Greedy Baker
is using everyday items to decorate a spectacular rainbow cake, perfect
for any celebration. It’s vivid, bright and has us cheering for a
supply list including zip lock bags and spoons. And once you see how
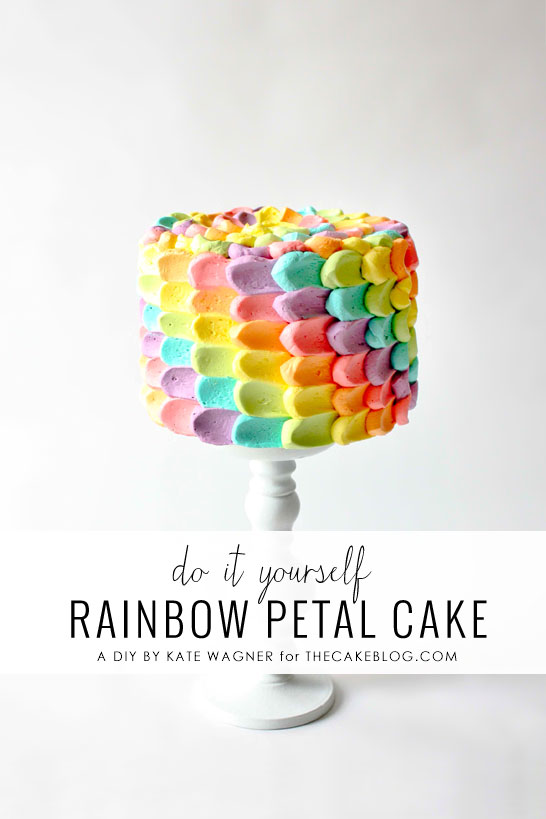
easy it is, you’ll be cheering too! It’s a DIY Rainbow Petal Cake!
This style of cake decorating is super simple yet incredibly effective. Most importantly it doesn’t require any fancy decorating equipment, just every day items found in most kitchens. So grab a spoon and let’s get started!
RAINBOW BUTTERCREAM PETAL CAKE
a DIY by Kate Wagner
Materials:
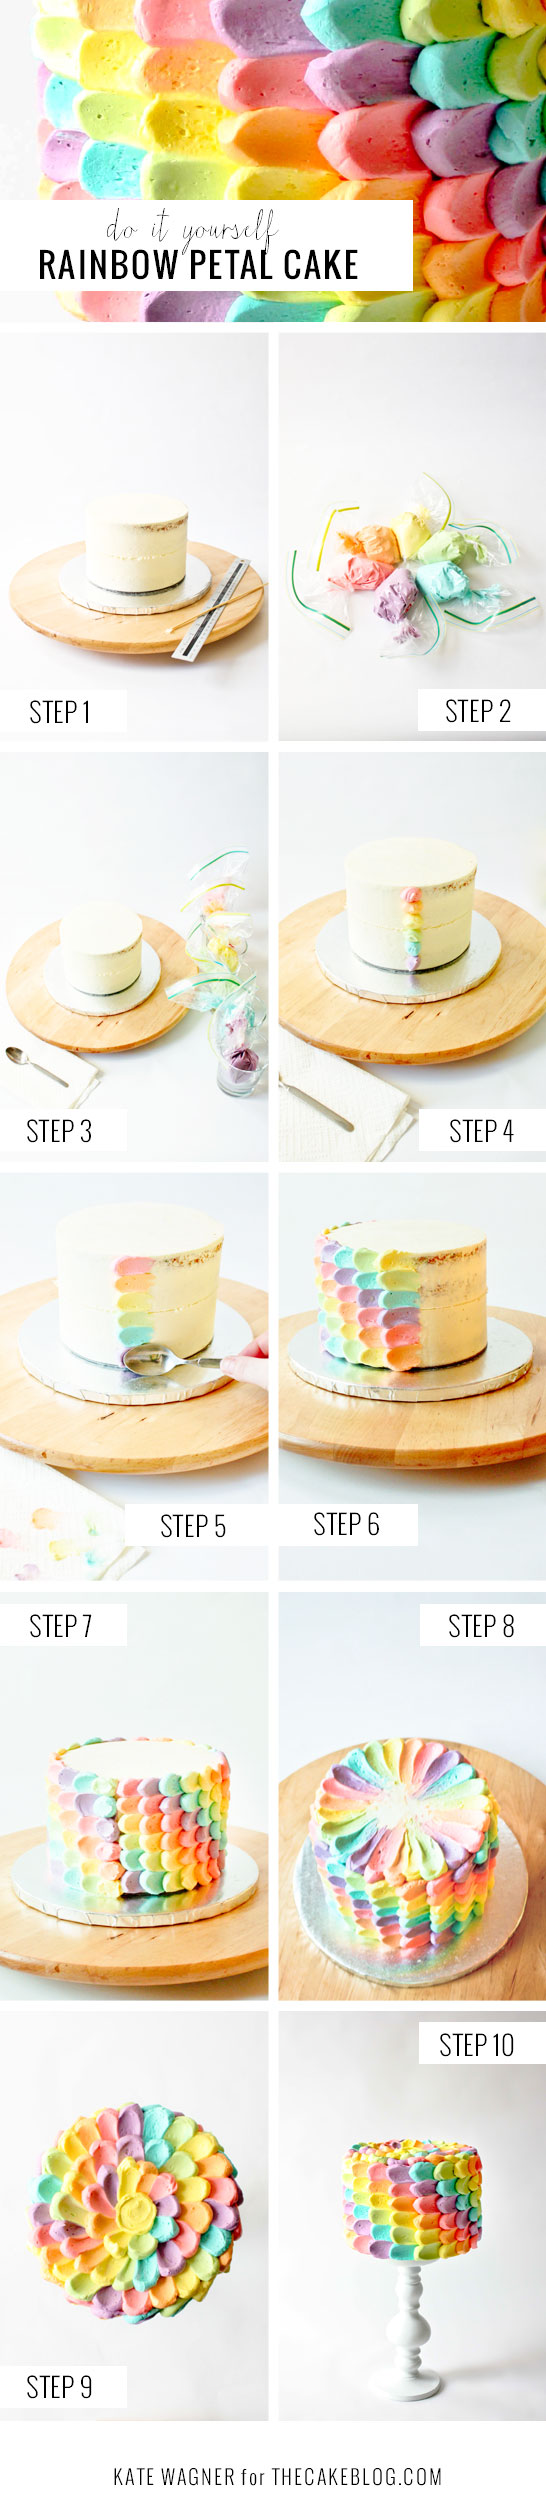
STEP ONE: Take your chilled, crumb coated cake and place on your turntable. Measure the height of your cake and using the skewer or toothpick mark mid height all the way around, holding the skewer against the ruler for a guide. This cake was exactly 4″ therefore the marking is at a height of 2″. This marking will be your guideline to help keep you piping dots in a consistent and even manner.
STEP TWO: Divide the buttercream into 6 x 1/2 cup amounts. Tint buttercream as desired. For this tutorial the ‘Electric’ range of gel colors by Americolor were used. Fill the zip lock bags with each individual color and snip off roughly a 1/4″ from the tip of each bag.
STEP THREE: Place each bag of buttercream into a glass and line them up in the order you wish to pipe. This simple tip will keep your workspace tidy as well as helping you keep track of the color order.
STEP FOUR: Pipe your first row of dots onto the cake. Use the guideline to help get even sized dots by piping 3 dots above the line and 3 dots below.
STEP FIVE: Take the teaspoon and using the back gently swipe each dot evenly to the right or left. Using the paper towel clean the teaspoon between each swipe so that the colors stay separated.
STEP SIX: Continue to pipe and swipe rows of dots. Stop and check that you’re keeping a nice vertical line every few rows.
STEP SEVEN: When you have reached your starting point finish up with a row of unswiped dots. This will be the back of the cake.
STEP EIGHT: At this point chill the cake for 10 minutes before starting on the top. Once chilled, pipe a circle of dots around the outer top edge and swipe into the center.
STEP NINE: Continue in this manner until finishing with a single dot of color right in the very center. Alternatively you might like to finish the top in a snail style, swirl pattern. In this case you would start again from the outer edge, pipe a single dot, swipe and repeat until you’ve reached the center. Again finish with a single dot.
STEP TEN: Step back and admire your rainbow creation. Then serve and enjoy!
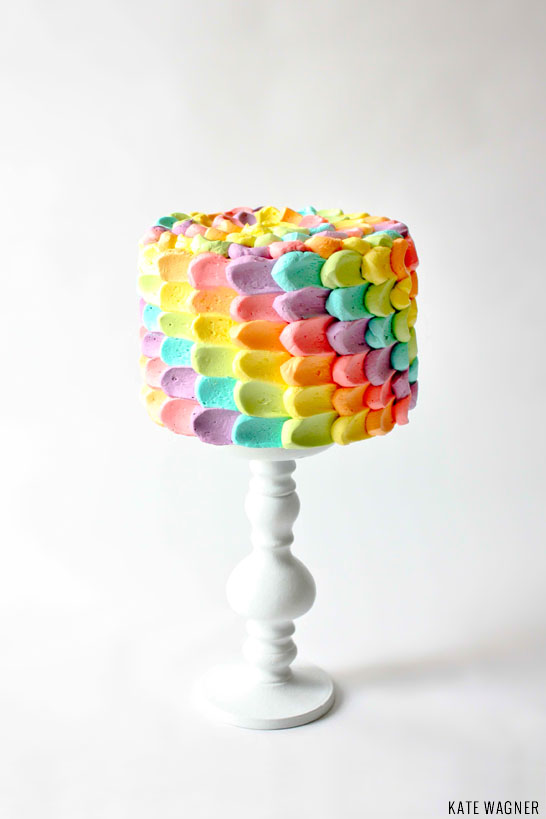
Have fun with this simple buttercream technique by changing up the colors and patterns – there are so many design possibilities!
VENDORS & CREDITS:
Cake & Tutorial: Kate Wagner of The Greedy Baker
This style of cake decorating is super simple yet incredibly effective. Most importantly it doesn’t require any fancy decorating equipment, just every day items found in most kitchens. So grab a spoon and let’s get started!
RAINBOW BUTTERCREAM PETAL CAKE
a DIY by Kate Wagner
Materials:
- 6″ crumb coated cake, chilled.
- Cake board or plate
- Skewer / Toothpick
- Ruler
- 3 cups Buttercream
- Icing / Frosting food color
- 6 zip lock bags
- A teaspoon
- Paper towel
- Scissors
- Turntable (optional)
- 6 glasses/cups
STEP ONE: Take your chilled, crumb coated cake and place on your turntable. Measure the height of your cake and using the skewer or toothpick mark mid height all the way around, holding the skewer against the ruler for a guide. This cake was exactly 4″ therefore the marking is at a height of 2″. This marking will be your guideline to help keep you piping dots in a consistent and even manner.
STEP TWO: Divide the buttercream into 6 x 1/2 cup amounts. Tint buttercream as desired. For this tutorial the ‘Electric’ range of gel colors by Americolor were used. Fill the zip lock bags with each individual color and snip off roughly a 1/4″ from the tip of each bag.
STEP THREE: Place each bag of buttercream into a glass and line them up in the order you wish to pipe. This simple tip will keep your workspace tidy as well as helping you keep track of the color order.
STEP FOUR: Pipe your first row of dots onto the cake. Use the guideline to help get even sized dots by piping 3 dots above the line and 3 dots below.
STEP FIVE: Take the teaspoon and using the back gently swipe each dot evenly to the right or left. Using the paper towel clean the teaspoon between each swipe so that the colors stay separated.
STEP SIX: Continue to pipe and swipe rows of dots. Stop and check that you’re keeping a nice vertical line every few rows.
STEP SEVEN: When you have reached your starting point finish up with a row of unswiped dots. This will be the back of the cake.
STEP EIGHT: At this point chill the cake for 10 minutes before starting on the top. Once chilled, pipe a circle of dots around the outer top edge and swipe into the center.
STEP NINE: Continue in this manner until finishing with a single dot of color right in the very center. Alternatively you might like to finish the top in a snail style, swirl pattern. In this case you would start again from the outer edge, pipe a single dot, swipe and repeat until you’ve reached the center. Again finish with a single dot.
STEP TEN: Step back and admire your rainbow creation. Then serve and enjoy!
Have fun with this simple buttercream technique by changing up the colors and patterns – there are so many design possibilities!
VENDORS & CREDITS:
Cake & Tutorial: Kate Wagner of The Greedy Baker
No hay comentarios :
Publicar un comentario